Application Security Project
Infosecurity Project
Introduction
In cybersecurity, we often hear the term CIA triad. This term refers to the 3 principles of data security - confidentiality, integrity, and availability.
In this project, my team and I will have to come up with solutions that addresses the principles, and weigh their importance at the same time.
I worked on data masking, while my teammates worked on data backup, data encryption, and data detection.
Scenario
The name of our solution is Updata. It focuses on a recruitment agency, where there are 3 main roles.
(1) Candidate Manager
Registers new candidates into the agency and interviews them to find out more about their job interests.
(2) Hire Agent
Suggests relevant job applications to the candidates that are clients of the recruitment agency.
(3) Administrator
Has all permissions assigned to the candidate manager and hire agent roles.
The table below shows a summary of the permissions assigned to each role.

Features I Worked On
The following is a list of all my responsibilities in this project:
(1) Data masking - View, preview, configuration modification
(2) File privacy
(3) Login - 2 factor authentication
(4) Access control
(5) Creation and management of the company's employees (Administrator, candidate manager, and hire agent)
Includes create users (with password policy), update users, and password privacy
(6) Company details page
In this page, I will share about the main features, which is data masking and file privacy.
Main Python Modules Used
This project was done in python.
Python modules used:
- fitz (pdf masking)
- pyMuPDF (pdf masking)
- openpyxl (excel spreadsheet masking)
- docx (word document masking)
- shutil (file management)
- os (file management)
- re (regular expression matching)
- pyotp (OTP)
- datetime (OTP validity period)
- flask_mail (sending the OTP in an email)
Main Feature #1: Data Masking
Data masking takes place when the logged in user tries to view the “candidates” database, or when he or she tries to view the files (resumes and notes) uploaded for each candidate.
The main data that I will detect using regular expressions and mask are NRIC, mobile number, email and postal code. If users wish to mask more data, they can enable the “special detection” feature that my teammate oversees in this project.
Data Masking Policy
The table below shows what information is masked for each user role.
**The administrator can view all sensitive data.

Viewing the information of candidates in the database
When a user logs in to view the candidates table, my function will mask the database before showing the contents to the logged in user.
Database masking is done dynamically. This means that only when the user requests to view the information that is in the database will my function proceed to mask the information. Before masking, I will check the role of the logged in user.
Masking in the comments field is done on a word basis, where only the sensitive data is masked instead of the entire comments field.
The example below shows a masked version of the database, where not the entire comments field is masked.

Viewing the resumes and notes
A user can view the files uploaded for each candidate. However, before the file is displayed, masking will be carried out.
To know what data to mask for each user, my function will first check the role of the logged-in user, then refer to the table of regular expressions. This table contains the category, regular expression and a value to decide which role should the masking be applied on.
Based on the role of the logged-in user, a list of regular expressions will be collated and sent over to the masking function, where it loop through the list to match sensitive data in the document for masking.
A variety of files can be uploaded, so I made masking possible for the following 4 formats:
-
Word document (.docx)
-
Text files (.txt)
-
Excel spreadsheets (.xlsx)
-
PDF documents (.pdf)
TYPE 1: Word Document Masking and Viewing
Python modules used:
-
docx
-
re
Word document masking is done by looping through all the lines in the document and checking for sensitive word matches using the list of regular expressions.
Because sensitive data can exist in the header and footer, and not only in the body, I used recursion to check all parts of the word document so that all sensitive data is detected and masked.
All masked word documents have the common name maskedDoc.docx.
The screenshot below shows a resume in a word document format with the phone number, email and postal code masked. Special detection was also enabled, resulting in the name and other dates present in the document being masked as well.

TYPE 2: Text File Masking and Viewing
Python modules used:
-
re
Text file masking is done by checking the file contents and matching them with the list of regular expressions.
As some matches can also be found in parenthesis, masking by words separated by spacing will not be effective. To overcome this, I added an additional function to ignore the parenthesis too.
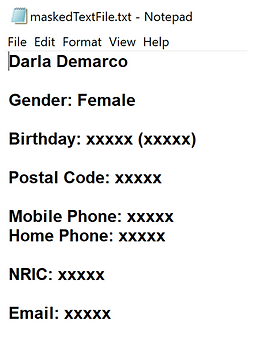
All masked text files have the common name maskedTextFile.txt.
The screenshot below shows a text file with the NRIC, postal code, email and mobile number masked. The birthdate and age were masked because special detection was enabled.
TYPE 3: Excel Spreadsheet Masking and Viewing
Python modules used:
-
openpyxl
-
re
Excel spreadsheet masking is done by checking cell by cell for sensitive matches using the list of regular expressions. Because each excel file can contain multiple sheets, I made sure that my scan will check all sheets present so that sensitive data in all sheets are masked.
In some cells where only a portion of the words are sensitive, I will only mask the sensitive words and leave the other words readable. Only if the entire cell contains sensitive information will it be fully masked.
All masked excel files have the common name maskedExcel.xlsx.
The screenshot below shows a set of interview notes in an excel file with the address and mobile number masked. The names and additional dates were also masked because special detection was enabled.


TYPE 4: PDF Masking and Viewing
Python modules used:
-
fitz
-
pyMuPDF
-
re
PDF masking is done by checking the contents of the document for matches using the list of regular expressions.
To perform redaction, converting it to word document and converting it back to a PDF format after masking would not work. This is because when we convert it to a word document, the format of the document will change.
Hence, scanning the document in the original PDF format and performing the redaction after was done instead.
All masked PDF files have the common name masked_pdf.pdf.
The screenshot below shows an example of a resume in PDF format with the phone number, postal code, and email address masked. Additional information like the name and dates were masked because special detection was enabled.

Configuration Modification (for the Masking Function)
The company’s data security policy will change over time. This means that the type of data that is to be hidden from the different user roles will change.
To support such changes, the administrator has to be able to make modifications to the configurations for masking. Hence, I have created a function for the administrator to modify the permissions for the various categories of sensitive data.
The “permission” decides whether the sensitive data should be masked from that user role’s view.
Modifications in the permission is immediate. If a user attempts to view a document immediately after, the tool will refer to the updated table of permissions.
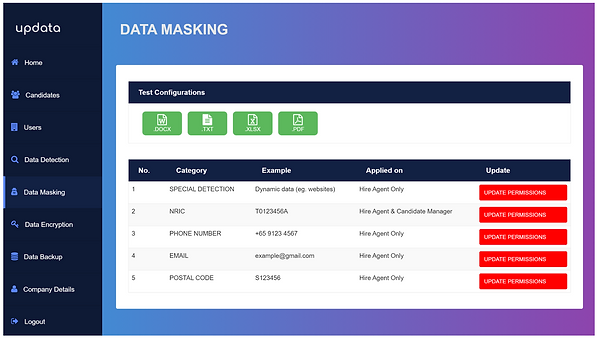
Masking configurations table:

Preview (by Administrator)
The administrator has the maximum privilege level. As a result, nothing has to be masked when the administrator attempts to view the candidates database or the uploaded documents.
However, if the administrator has made changes to the configurations for the type of data to mask at each user’s view, it can pose a difficulty when it comes to verifying the changes.
Hence, I have implemented a preview function where the administrator is able to view files as different user roles: Candidate manager and hire agent.
The preview function supports the following 4 formats:
-
Word document (.docx)
-
Text file (.txt)
-
Excel spreadsheet (.xlsx)
-
PDF file (.pdf)
The screenshot below shows the location where the administrator can access the preview function, also known as “Test Configurations”.
Masking is done dynamically – whenever the administrator wants to preview a document.
The selection of the type of user to preview the document as can be found at the “upload file” page as shown below. The administrator can choose either “Hire Agent” or “Candidate Manager” from the drop-down menu.

Main Feature #2: File Privacy
There are 3 components of the file privacy feature:
(1) Original Files
(2) Masked Files
(3) Auto-Deletion of Masked Items
Original Files
The names of the original files are protected because they are not displayed when candidates are being viewed.
Masked Files
All masked documents have a common file name. This prevents the attacker from deriving the original file name of the candidate.

Auto-Deletion of Masked Items
It is possible for the masked files to be unmasked when it is the administrator viewing the files uploaded for a candidate.
To ensure the privacy of the contents of the files, be it masked or unmasked, they are automatically deleted under the following circumstances:
-
Viewing of masked document/database is completed
-
An error has occurred
-
A logout takes place
Key Takeaways from this Project
I learned about the different possible ways to mask data, regardless of the file format - database table, word document (.docx), text file (.txt), excel spreadsheet (.xlsx), and pdf (.pdf).
In each of the formats, I had to use different python modules to open and modify the contents to mask the sensitive data.